@Jetson YOLO: YOLOv8 Segmentation With CSI Camera
This chapter extends the earlier YOLOv8 setup into a live CSI camera segmentation pipeline on Jetson Orin Nano.
Rebuild OpenCV With GStreamer Support
Activate the yolov8 environment first:
conda activate yolov8Then rebuild or reinstall OpenCV with the GStreamer-related capabilities you need:
cd ~/Dependency
git clone --recursive https://github.com/opencv/opencv-python.git
cd opencv-python
sudo apt-get update
sudo apt-get install -y build-essential cmake git libgtk2.0-dev pkg-config libavcodec-dev libavformat-dev libswscale-dev
sudo apt-get install -y python3-dev python3-numpy libtbb2 libtbb-dev libjpeg-dev libpng-dev libtiff-dev libdc1394-22-dev
sudo apt install libgphoto2-dev

export CMAKE_ARGS="-DWITH_TBB=ON -DWITH_V4L=ON -DWITH_QT=ON -DWITH_OPENGL=ON -DWITH_GTK=ON -DWITH_FFMPEG=ON -DWITH_IPP=ON -DWITH_OPENMP=ON -DWITH_OPENCL=ON -DWITH_CUBLAS=ON -DWITH_NVCUVID=ON -DWITH_EIGEN=ON -DWITH_GSTREAMER=ON -DWITH_LAPACK=ON -DWITH_TIFF=ON -DWITH_JASPER=ON -DWITH_WEBP=ON -DWITH_OPENEXR=ON -DWITH_PROTOBUF=ON -DWITH_1394=ON -DWITH_GPHOTO2=ON -DWITH_LAPACK=ON -DWITH_XINE=ON"
export ENABLE_CONTRIB=0
export ENABLE_HEADLESS=1

pip wheel . --verbose
Then install the generated wheel.
After installation, verify that OpenCV is present in the active conda environment.
Run the Segmentation Test
The following script exports a segmentation model if needed, opens camera 0 through a GStreamer pipeline, and runs YOLOv8 segmentation frame by frame:
import os
import cv2
from ultralytics import YOLO
import time
model = YOLO("yolov8m-seg.pt")
if not os.path.exists("yolov8m-seg.engine"):
model.export(format="engine")
trt_model = YOLO("yolov8m-seg.engine")
def gstreamer_pipeline(capture_width=1920, capture_height=1080,
framerate=30, flip_method=0,
display_width=640, display_height=480):
return (
"nvarguscamerasrc ! "
"video/x-raw(memory:NVMM), "
"width=(int)%d, height=(int)%d, "
"format=(string)NV12, framerate=(fraction)%d/1 ! "
"nvvidconv flip-method=%d ! "
"video/x-raw, width=(int)%d, height=(int)%d, format=(string)BGRx ! "
"videoconvert ! "
"video/x-raw, format=(string)BGR ! appsink"
% (
capture_width,
capture_height,
framerate,
flip_method,
display_width,
display_height,
)
)
video_cap = cv2.VideoCapture(gstreamer_pipeline(), cv2.CAP_GSTREAMER)
while video_cap.isOpened():
success, frame = video_cap.read()
if success:
start = time.perf_counter()
results = trt_model(frame)
end = time.perf_counter()
fps = 1 / (end - start)
annotated_frame = results[0].plot()
annotated_frame = cv2.cvtColor(annotated_frame, cv2.COLOR_RGB2BGR)
cv2.putText(
annotated_frame,
f"FPS: {fps:.2f}",
(10, 30),
cv2.FONT_HERSHEY_SIMPLEX,
1,
(0, 255, 0),
2,
cv2.LINE_AA,
)
cv2.imshow("frame", annotated_frame)
if cv2.waitKey(1) & 0xFF == ord("q"):
break
else:
break
video_cap.release()
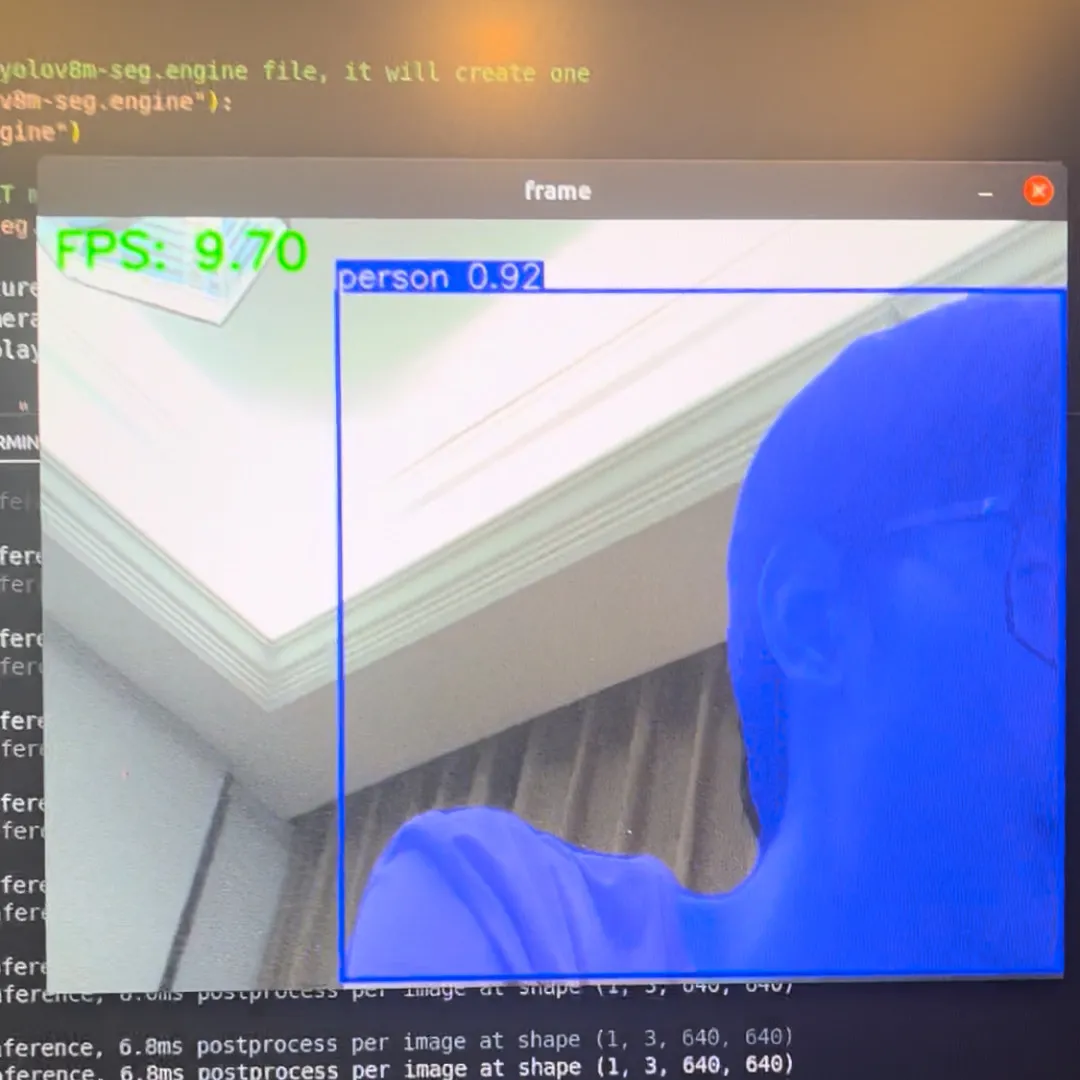
cv2.destroyAllWindows()If everything is wired correctly, the result looks like this:
Common Runtime Issues
libffi / p11-kit Symbol Errors
sudo apt install --reinstall libffi7 libp11-kit0
sudo apt list --installed | grep libffi
sudo find /usr -name libffi.so.7
ln -sf /your/path/to/libffi.so.7 ~/anaconda3/envs/[your_env_name]/lib/libffi.so.7
libgomp.so.1: cannot allocate memory in static TLS block
This is a common ARM-side runtime problem. The usual workaround is:
export LD_PRELOAD=/usr/lib/aarch64-linux-gnu/libgomp.so.1Or inside Python:
import os
os.environ["LD_PRELOAD"] = "/usr/lib/aarch64-linux-gnu/libgomp.so.1"
import cv2
GStreamer Plugin Cache Problems
If you see warnings about libgstlibav.so failing to load:
rm -rf ~/.cache/gstreamer-1.0/This is usually enough to clear the stale cache and let GStreamer rebuild it.
At this point, you have moved from a static-image TensorRT export into a live Jetson camera inference pipeline, which is where the platform starts to feel genuinely useful.